I ordered some fabrics from Fashion Formula with a few of my patterns on, I ordered three in little samples and the hedgehog print and a squirrel secondary in fat quarters.
As per a little aim on my brief, I wanted to add some stitch to a couple of them to see how this would look.
The fabrics as they came
I loved how vibrant the hedgehog print came out, and I thought I would love to make that into a proper cushion cover to see how that would look.
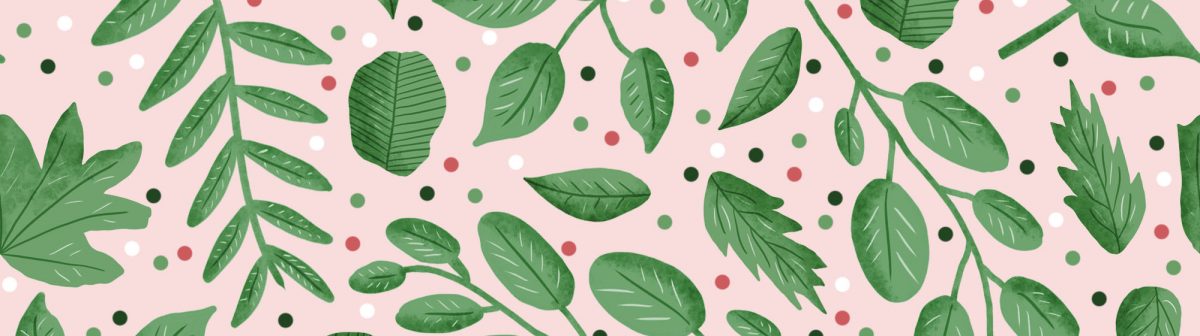
Stitching on a couple of samples
On the leaf print I outlined the green leaves with a single line of stitch, which I think is pretty and makes it stand out a little more. Then on the mushroom print I tried completely blocking out a yellow and green mushroom to see how this would look. Overall I think the outline worked better but I do think they work nicely as purely printed designs, which could be added to a little depending on product if it was suitable. The small scale of the print and the actual sample meant the blocked out ones did not look as neat as they could of. I think to improve the outlining I could have tried quilting to raise the shapes off of it a little.
The cushion
The cushion also worked out well and I think the scale looks pretty perfect for the size of it, I would love to do some more of these to put onto Etsy or something too. Overall I think getting them printed onto fabric was a good idea because it helps to show the colours even better than the paper printouts did, and how the colours behave on the various fabrics. This was just a poly panama as I wanted something quite light and airy, which I think was effective here.
I am constantly on the lookout for contests to do, I enjoy it as well as getting more of my work out there and seeing what patterns etc are successful. The Wraptious contest is designing for cushions and art prints, two products that I would actually love to create using my own designs, so this was a perfect chance to do just that, using five designs that I am quite proud of.
The designs are shown on the site by displaying them on mockups on the framed prints and cushions. I decided to include the hedgehog hero design, I think it is very effective with its bright colour and half dropped design. The red squirrel placement is cute and I think works well on a cushion and an art print, I also used a secondary from the red squirrel collection with the bright foliage, and then I looked at my contest designs, the ice lollies and British owl designs I think look great on products, I havent seen them on products due to just doing them for flat patterns so this was great to see.
The contest is judged on votes via facebook likes and shares, an update if anything happens.
After my completion of the first kind of draft of my dormouse collection on Saturday, I took a break on Sunday (Probably my first day off in over three months!) and then got back into it today. My first job was drawing up the motifs and performing colourways of the different motifs that I was going to use around it. As I mentioned previously, there is a slight change in the colours from one mini collection to the next, simply using a different combination of the four key colours, pink, green, blue and yellow. The red squirrel was done using warm browns, as to not take it too far on the bright red spectrum, and then the other colours were pink, blue and yellow for this little collection.
Motif Drawing
I always complete a range of motifs to choose from in a variety of colours. The worst thing I encounter is when I am halfway through a pattern, think that I just need a little pink space filler here, and then actually see that I have a blue one and a yellow on and no pink, so I have to do back to drawing. So now I always make sure I have a lot of different colours, shapes, and combinations of motifs to get through the hero and beyond.
First Hero attempts
I tried out some hero designs here using the squirrel motifs, and I do not know quite what I wanted to do here because something just seems off with it.
Full Block Repeat
I put them into repeat but I knew I wanted to adapt the tile into a half drop anyway, but first I wanted to be happier with the actual hero design.
Second Hero Designs
I created a second hero design here and just used more of a pink and blue majorly over the yellow in this one. I liked this a lot more I think it just looked like a better balance with the colour and less crowded with the colours, not the motifs, the pattern is busy and I very much think that is my style.
Half Drop Tiles
I now went into the half drop building from this tile and I am happy with the end result of this, I actually think I like the white one because the motifs seem to stand out a lot more from the background. The dots have been very useful in my designs to fill some space and also make some designs look a little more modern. They also bring some of the key colours into the design again in a more blocky way which I like.
Half Drop Repeat
The repeat is probably more of a small scale than I would have liked it but overall I am quite happy with it and the colour balance. The squirrel motifs look how I wanted them to and the different poses have given quite an interesting variety.
Getting Started on some Co-ordinating designs
From the motifs in the hero and more colours and styles of it, I decided to start some patterns that go along with the hero I had created. So I knew I had blue and pink in my mind but I wanted to be mindful of using enough of the yellow too. I created some colourways of a couple of these designs too. I particularly like the first multi-coloured design on the white as the motifs really stand out against the white background.
Blender Designs
I think I am getting the hang of using blender designs better, I think they are still a little busier than I have seen before but I definitely gravitate towards this busy style and I think if done on a very small scale, the busyness works as a blender too. I do like the dots again, this seems to be a nice idea to combine my colours, and I can quickly give this a few different colour options in the background, and maybe changing the dots once or two and ending up with a complex and busy dot design.
Squirrel Placement
I did a poll on my design instagram, and came up with the faded dot design being voted the best one, so I went with this again and I think it has worked well here too. Overall the colour scheme of the little collection was pink, blue and yellow, I mainly used blue and yellow and white for backgrounds in this collection as I knew the pink was quite dominant in the dormouse collection and I wanted to avoid it being bold in all of the collections, except the one where it does not feature in as I think it would just look like too much of it if the three with pink were all heavy on the pink and the one wasn’t, I want the designs to flow and have that similarity between them, almost like it isnt obvious that one is missing one of four colours each time.
Squirrel Pattern Board
I created the pattern board here to tie together my designs and figure out which ones of them I wanted to use, I have colourways for most of these which I think I could incorporate into a later board, but for now, this shows the blue, yellow and pink squirrel board.
Dormouse board
Compared to the dormouse board, the pink and yellow flow through it but the blue has given it a different look, and thats what I hope for when I continue into the hare and the hedgehog with the colour schemes working like that.
I just finished submitting my entry for the Spoonflower Large Birds contest, from which I also created a little collection of coordinating designs from. I also posted one last week for the Quiet Spaces category too.
I have started to notice now that my designs are getting more engagement as the weeks go on, usually each post doing better than the last which is exciting because it must mean I am refining my style and doing something right. I could go back to the start of them and notice little problems in the first couple of patterns, such as the Pastel Cafe one, was too pastely, it needed some more dark in the design to add more of a colour balance into it, which I did struggle with a little in the foliage coordinating designs from the Large Birds one, I used a lot of dark browns in the birds so the lighter blues and pinks in the actual pattern were good being lighter, but I do wish I had made some a lot darker, as I much more often than not choose a light background for my designs.
Quiet Spaces Entry
I used some similar plant pots for the Pastel Cafe design challenge weeks and weeks ago, so I took some inspiration from them and kind of repurposed them with newer techniques I have learnt on Procreate, such as easily adding pattern and shading to motifs. I originally had a wite background on this design and I think it looked better in the blue, but there is not much white at all in there and something is not quite right with the colour balance I think. I was working hard last week on my sketchbooks and I left this one a little later than usual, but overall I am happy with it as a simple repeat.
The Large Birds contest was one I thought a lot about with the content, I floated some ideas with my friends in a groupchat, penguin, peacock, eagle, all good options but I was not particularly excited about any of them. I started looking in some of the bird books we have around the house, they come in handy when spotting weird birds in the garden and for situations like this. The bird pages have facts about wingspan, sometimes having the birds flying next to other popular ones to compare sizes. This is when I noticed how big the snowy owl actually was, and looking at some of the other species I noticed they were not that much smaller either, such as the long eared and short eared owls, the tawny owls were bigger than I thought, I thought they were tiny!
Anyway, I love owls and how recognisable they are, and very attractive birds that have been on trend before, and just seem to be one of those patterns that does not go out of fashion, but I knew I wanted to go with my more graphic digital painting approach to get some texture and detail into it. I created blue and pink foliage around it because I thought about how my colour palette is usually involving a lot of greens because I use a lot of nature in my work. I actually really like the foliage secondary designs I created, but I do think they do not look like they go perfectly with the owl design by itself. I did try and correct the colour balance using some space filler dots, which I think worked out really well to add more colour in the designs.
The next contest I believe is Ice Cream Truck, so I think for that one I want to try and go really out of the box with my usual colour schemes and try something bold and bright!
I chose to take part in the next Spoonflower contest, called ‘Canadian Wildlife’, so the first step was to do a little research and see what kind of animals and trees I could look at. I thought about moose, bears, they seemed a little obvious, and large animals, so I thought I would look for something smaller, which is where I came around the beaver, red fox and arctic hare. I think they worked well because they all have a slightly different colour to them, and with green forest colours I think it gives a nice little natural colour scheme.
The Hero Design submitted
I submitted this design above, using a mixture of the animals and a lot of trees and foliage as well. I was really enjoying using these animals and motifs though, so I decided to create some designs to go along with it, I think this is a good practice to do just to practice making these families of designs. If I was doing this for a full collection I would have taken more time to do some more motifs, smaller motifs and maybe add a more contrasting colour into it. But working from this one hero is a task in itself to see what different things can come from it.
The Coordinating Patterns
So these show what I was playing with from that main design, and the repeat of it here at the bottom. While I think it is an obvious repeat, I do tend to stick to basic tile repeats for spoonflower as I want it to be easy to see in the tile when people are looking through and voting for designs. I could see this working for stationary or small giftware things like my main collection, I think this has given me some confidence in designing animal motifs that are not really realistic too as I want to be able to show some life and texture to them without them being boring and flat too.
Continuing to enter contests and take a few hours out of my week to do this regularly is helping me expand my work and practice pattern making while I am still in the mark-making stages of my collection.
I found I was actually coming to the end of my first sketchbook, I chose to focus on leaves and foliage in the one sketchbook, and use a different one for the animals, and the plan was to kind of combine them and work on motifs that incorporate both in whichever sketchbook has more room left in it. But right now I think I will start another A3 book to continue with the plants and foliage, because I have yet to start with the berries, nuts, acorns or structures development in my book.
I continued to explore some styles that I was enjoying using, and working on combining them and refining them, and considering how they would translate over to a more digital format as I plan to take my mark-making over to Procreate as well.
Sketchbook Pages
These pages show the continued experimentation with techniques that I think could work well for motifs, although I think I would have liked to try a thin dark green outline on the lighter green leaves for example to avoid the heavy use of black, but I found a sharpie was not achieving this look in the colours and the use of paint just would not achieve that thin perfect line that I wanted, but again this can be done on Procreate.
Favourite Leaves and Shapes
I took some of my favourite shapes of the leaves to use and to try and name a few of them. From here I knew I wanted to go ahead and play with the solid shape of it more that I touched on previously.
Experimenting with Techniques and shapes
I tried out some techniques here that represent the idea of shape a lot, such as the cut out and the patternwork shapes, I also tried an embroidery technique and a woven technique which I think helped to amplify the shapes and form of them more as the stitches defined the edges and the woven technique made from squares is quite obvious. I also tried the wax resist by drawing with a candle which was quite good to give a strong line drawing. I also went back to some of my favourite techniques such as the leaf skeletons, the splatter resist of the shapes and the bleach outlines too. I want to think of some ways to translate this better to Procreate and digital and see what I can do with it then.
Lino and Patterns
I worked agin with lino here but made sure they were cut out shapes that would make clear motifs, I then made such the veins were the right kind of shape on there, and went ahead and tried out some patterns with these, over watercolour and bleach backgrounds or just plain white to focus more on the motifs.
I wanted to create a website that I could expand as I produced more work, but creating it now means I have a lot less to do later on when I need it to be completed. I launched the website a couple of days ago after working on it for a couple of days before that.
Right now it shows a portfolio of my work which I will continue to add to, it also had a lot of my CV information in one place, links back to this blog, and has a domain name which I am pleased with.
The homepage shows my name, logo and my title. I think I do need to work on this page more and just add more hyperlinks on it, to important parts of my site. So far I added a link to my last module’s patterns, my CV and local inspiration of places around me.
My CV
My CV had not been updated since I applied for the Welcome Crew position last summer, so I had done a few things since then which was nice to add onto it. I kept my experience on here relevant to my field now, so I did leave out a couple of jobs in my gap year. Again this could be something I could adapt and add to easily, which is great to have where employers could access it easily if they wanted to. I would like to get a different photo, maybe of me doing my work or something as I do not have any photos where I look very professional in my field.
I took a CV workshop before and have been watching videos on a couple of different websites about CVs and job hunting, which I think were useful in me getting more serious about producing them. I worked on my LinkedIn too as it is now linked with my website, I found this quite hard as seeing there people’s can be quite intimidating, but I would like to start posting more on it.
I think having my website address now means I can put it on my business cards and get going with designing them as well.
I wanted to carry on taking part in the design contests, and the next one is Midsummer Festival, which when I researched, I found I was not getting a lot of ideas aside from flower crowns and the maypole. I chose a simple green and pink colour scheme as it worked well with all the greenery and flowers in the images.
I focused on the flower crowns as bold motifs in this display, I went with a similar method with the people as I did with the East Fork challenge a few weeks ago. I know I am not great at drawing faces and with this kind of graphic style anyway it worked better to leave the face plain to draw attention to the more detailed crown. I added little details like the eyebrows, eyelashes and lips as I think they set the face up with a couple of things in the right place, I also thought they would be the harder things to mess up. I think this design could have included another colour or something, but overall I do like it and the busyness of it overall.
I thought about embossing when I was designing cards because I was thinking about how to improve on them once they had been printed successfully, I looked into foiling too with the printing companies, I think i could have looked into methods of doing this at home but with the printing companies they are able to make it a lot neater and embossed as well. I ordered some embossing powder in the light green colour as I thought it would stand out quite nicely from the darker greens in my work.
So this was the pen that I ordered for it, it was only a couple of pounds from hobbycraft. I tried it out on some plain paper first.
The first photo shows the nearly see-through lettering, which is just drawn onto the paper using the pen. My pen has a choice of a pen or a brush-like end, so its whether you want a flowing line or a more rigid looking design. You then add a generous amount of the powder over the top, and then tip it off, making sure you save as much as possible. This is then how they look in the bottom image. You next need a heat gun.
It is quite hard to tell the difference here but there was a slight lightening to it after the heat gun had been applied for a couple of minutes. I thought this was quite a long time and googled it and a found a little tutorial, that showed the results within a couple of seconds, so I decided to try a different paper, and printed out the front of one of my card designs.
This next example on the happy shows it off much better, the colour difference and the fact that this took a couple of seconds to lighten and visibly look like it was melting together.
I tried one last example here on a different substrate, using the front of my sketchbook to try it out. I think it would look good if I practice my lettering, I used to do calligraphy and I think this style would look a lot better. I also think the powder that I ordered is probably not the best quality, I did not want to spend a great deal of money testing something like this out if it was not going to work. I think a nice gold would look good instead and a better quality would give the finish that I want for it. I would probably order that again if I create something that I would like to put some pattern and texture into.
The creation of my theme moodboard was by far the most time-consuming and thoughtful, I wanted to capture my thoughts in photographs, showing the journey from thinking of a normal everyday beetle to imagining it as a cute pattern on a child’s birthday wrap.
I decided to call my collection ‘It’s a Bugs World’, as it was aimed at children and I wanted it to be a cute watercolour style that would appeal to the children as well as the parents buying it. As my research indicates, I chose ladybirds, dragonflies and jewel beetles, mostly for their colour and shapes and what I think I could do with them. I think watercolours will be something I want to look into first for a style so I included some artworks that I thought fitted the ideas in my head. I also included some photos of marshlands where it is common to find the insects that had lovely compositions and colours in them.
My colour and texture board shows the colour scheme I have chosen from several images of particularly jewel beetles and their environments around them. I chose to have quite muted colours in comparison to the bold colours also present in some of the jewel beetles as I wanted to make this collection appealing to the intended market as a difference to some of the brighter designs we often see for children. I chose some textures that I would like to experiment with in terms of creating my own bark pattern to use as a faded background for a pattern perhaps as well as the leaves and the dots which relate to the dots on a ladybird. The dragonfly wings are also very pretty and intricate and I would like to experiment with this, they remind me a lot of a leaf skeleton too which I have photographed before so this might be something to try out in the photographic darkroom for a clear spacial print of the pattern.
My occasion board represents the children’s birthday I would be aiming the patterns at, I think this could make an interesting topic for me as I have not tried out patterns for the younger generations before, tending to stick to an age range closer to my own in previous modules. While this is still something I am interested in, I would like the challenge of creating for someone else as I think it would allow me to be more free with my designs, especially when it comes to watercolour. I have enjoyed working digitally in my last unit, especially with the use of Procreate on my Ipad which has been a very useful tool, but I also want to carry on with the more traditional media I have used for most of my creative career and also welcome Procreate to try a more artistic approach, using the various watercolour brushes they have available on there.
My customer board portrays the dual-market I am currently aiming at, the young mother I picture needs to be attracted to the designs to purchase them, whether its to wrap presents for their own children or for children’s friends to go to another birthday as my target of 5-10 year olds generally do not go shopping and pick out their own wrapping paper. I also need the patterns to be attractive to a child of this age, I think avoiding the bright colours could mean that I have a unique product in the market that stands out amongst the Disney theme for example. I have not yet determined whether this collection will be aimed at mainly girls or boys, I would like to try and make it appealing to both with my varied colour board, however this may be a decision when the patterns start as I will have a better idea of what the final product will look like.
Lastly, the competitor board illustrates what I feel my collection will be competing with. I chose middle range shops as I feel the designs tend to be more cute and muted, whereas the cheaper shops tend to go quite bright and bold with their designs. My research at Harrods was interesting but I do not picture my target market shopping at such high prices for children’s wrapping paper, I would certainly be narrowing down my market if I was to choose the luxury end over this middle ground.
Paperchase is quickly becoming one of the most popular places to splash out on stationary and quirky gifts and wrapping, they also have sustainable policies in place which I think is an important thing in an industry that could be considered wasteful. John Lewis and Next have a variety of designs that I think would suit children’s birthdays well, again using complimentary colours, Waitrose designs are a little more bold, but I was interested to see that they had an insect design as I really cannot find much in other stores. The giftwraps included in this moodboard retail from around 3.50 a roll to 6.00, with an average length of around 3m, which is not a bad price, but considering cheaper stores can sell 10m at even a pound or two sometimes, this is definitely in the middle of cheap and luxury, where in Harrods, a couple of metres on a roll was nearly eight pounds.
Overall I am happy with the design on my moodboards and feel much more confident about the direction my work will be heading, the trip to London definitely helped in terms of research images but I am currently in contact with someone at the Cardiff Museum hopefully to allow me to see into some of the archives of bugs, as even in London they did not have a vast amount out for viewing, and the ones that they did have out where quite difficult to view and photograph properly, presenting itself as more of an artistic structure than informatively showing you the different species on show.